How to Add a Location to Your Instagram Bio
Imagine this: your business has a new location in a vibrant neighborhood, and right now, you’re craving a steaming cup of coffee and a freshly baked cinnamon roll as you lazily scroll through your Instagram feed.
And then, a captivating post appears on your feed, featuring a picturesque local cafe in a quiet location less than a block away.
Intrigued, you decide to pay them a visit. And just like that, you find your latest hangout.
That’s the power of adding your own custom location to your Instagram bio. It connects your business with potential customers in your local area in an impactful way, boosting your visibility and, ultimately, skyrocketing your sales.
But how can you add a custom location on Instagram? Here’s how.
Why should you add your location to your Instagram profile?
Adding your location to your Instagram profile can enhance your social media presence by providing context and personalization to your content.
It can help your Instagram followers know where you’re based, showcase travel experiences, and highlight your business location.
Sharing your location on Instagram adds a layer of authenticity. It can attract a location-specific audience, especially if you have a physical store and tag products in your Instagram posts.
Additionally, creating a location tag can be helpful for networking, collaborations, and connecting with like-minded individuals in your area.
What are the benefits of adding a location to your Instagram bio?
Adding your location to your Instagram bio benefits your company in multiple ways. Here are three to consider.
Increased visibility
Adding a location to your Instagram bio increases your discoverability, as people who search online for businesses in your area can find you in the search results. Because Instagram is likely to have better SEO than most small business websites, doing this is an excellent way to get found as it allows you to piggyback off Instagram’s notoriety.
More engagement
People often like to know you’re a real business before interacting with you. One way to boost that perception of ‘realness’ is to add a location to your Instagram bio. This works because people know that a business with a physical location is less likely to be a fly-by-night firm. Just ask the 67% of people more likely to trust a local business than one that operates exclusively online.
Increased sales
More engagement on your Instagram account is excellent. But by itself, your engagement rate means nothing unless it translates to increased sales. In this sense, adding a location to your Instagram bio is a twofer. Because people know they can easily find you at a physical location, they will be more likely to buy from you if something goes wrong. It’s a powerful way to increase trust in your brand.
How to add location on Instagram profile page
There are two primary ways to add a custom location to your Instagram bio.
You can change your location through your Facebook page to show up on the Instagram map or drop a link to your location in your bio.
The first method only works if you have an Instagram Business account, while the second works regardless of whether you have a Personal or Business account.
Let’s take a look at both methods.
Method 1: Change your location through your Facebook page
This method will allow your business location to be displayed on the Instagram Map and tagged in posts and stories.
You must have an Instagram Business account and a Facebook page for this method to work. You must also have Facebook access to your page to add or change the address.
Check that you have those, and then proceed as follows:
- From your Facebook feed, click on Pages in the left menu
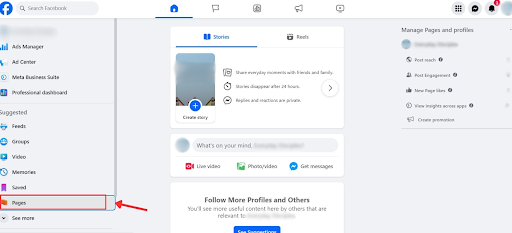
- Select the page you want to add an address to.
- If you are coming from a personal Facebook account, you will see a notification in the bottom left corner of the screen asking you to switch to the page to take more action (you will also see a similar notification just below the page menu). Click Switch, and Facebook will entirely switch to your Business page. If you don’t do this, you won’t be able to change the page.
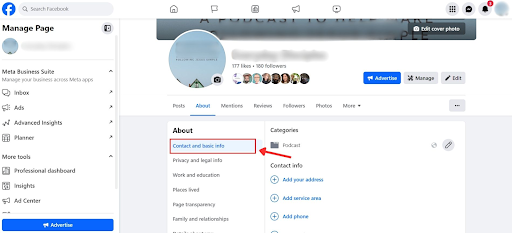
- When you reach your Facebook page, click About on the menu below your profile picture.
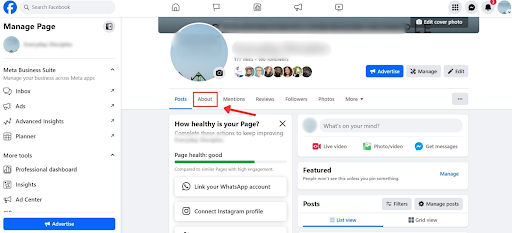
- Select Contact and Basic Info from the left menu. You will see the Facebook page’s contact details displayed to the right of the page.
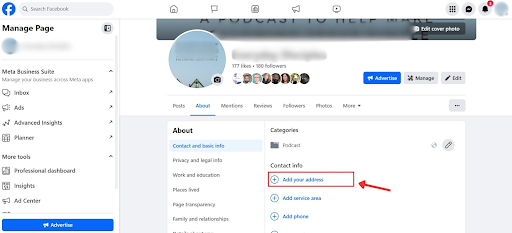
- Below the Contact Info section, click Add Your Address, then type in the address.
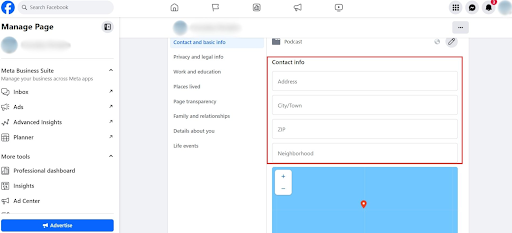
- Hit Save.
- Finally, if you haven’t already done this before, connect your Facebook page to your Instagram account by selecting the Instagram tab. And that’s it!
Method 2: Drop a location link in your bio
This method works whether you have a personal or business Instagram account.
But it won’t work on your computer because editing links on your Instagram profile only works on mobile. You’ll see what we mean in a bit.
These are the basic steps:
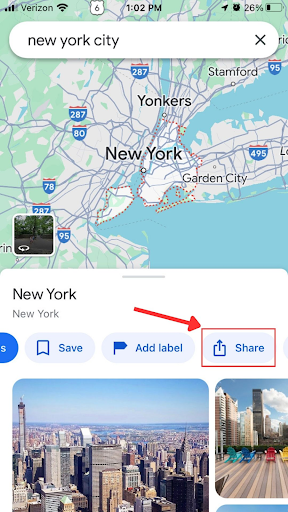
- Hop into Google Maps on your phone and search for the specific location you want to add. You can type the address into the search bar to find it.
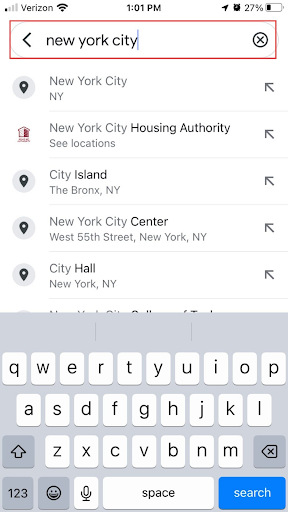
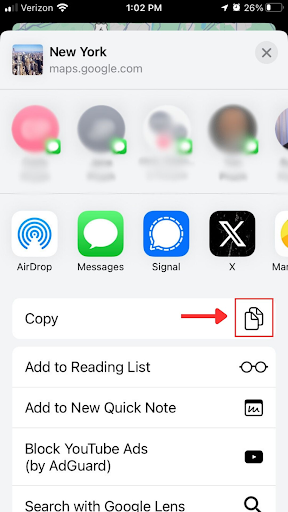
- Once you find the address or location you want on Google Maps, hit Share and tap Copy. This will copy the link to that specific location.
- Close Google Maps and head over to Instagram. Navigate to your profile by tapping on your profile picture on the bottom right of the app’s home screen.
- Tap on Edit Profile.
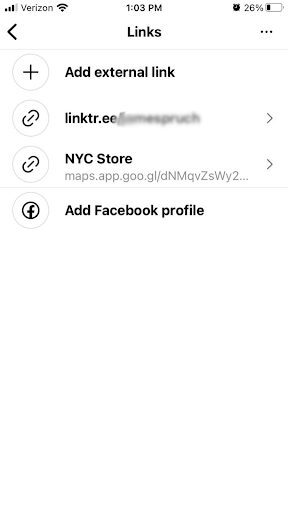
- Under the Links heading, tap on Add Links.
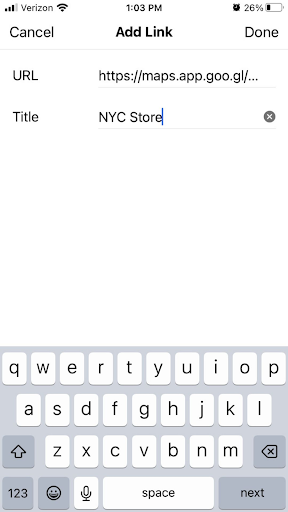
- On the next screen, tap Add External Link, then paste the link you copied from Google Maps. By default the map’s link will show up there. You can give it a title — maybe the name of your business or the name of that location/office, for example.
- Hit Done, and then go back to your profile.
- Refresh the page by pulling the screen down, and voila! You’ve added a location to your Instagram bio.
FAQ about adding your location to Instagram bio
Why should I add my custom location to my Instagram bio?
Adding a custom location to your Instagram bio can help your followers and potential new followers know where you are based or your current location. It can provide context to your posts, especially if your content is location-specific or if you’re a business with a physical presence.
How to add your custom location to Instagram bio
There are two methods for adding your own custom location to your Instagram profile. First, you can adjust your location through your Facebook page to show up on the Instagram map or drop a link to your location in your bio.
For the second option, search for a specific location on Google Maps and copy the location link. Then go to Instagram, edit your profile, add an external link with the copied location link, and refresh your profile to see the added location.
You can also use a third-party app like Zapier to add a custom Instagram location.
Is it safe to share my custom location on Instagram?
Instagram allows you to control the privacy settings of your custom location tag. You can choose to share your precise location or a more general location.
It’s important to be mindful of your privacy settings and only share the information you are comfortable with. Adjust your settings in the Instagram app to ensure your location is shared responsibly.
Can I change my custom location on Instagram frequently?
Yes, you can change your custom location on Instagram as often as you like.
This is useful if you are a frequent traveler or if you want to showcase different aspects of your life based on your location. Simply update your bio with the new location information to reflect your current whereabouts.
Does adding a custom location in my bio affect who sees my posts?
Adding your custom location to your Instagram bio doesn’t directly impact who sees your posts.
However, adding a custom location tag to your individual posts can make your content discoverable to users who search for or explore that location. This can potentially increase the visibility of your posts to a wider audience.
Can I add multiple locations to my Instagram bio?
Instagram allows you to add only one custom location tag in your bio. If you want to highlight multiple locations, you can consider creating a brief list or mentioning your general region.
Alternatively, you can use the location feature when posting individual content to highlight different places or activities you visit.
Final thoughts: How to add location on Instagram
It only takes five minutes, but adding a custom location to your Instagram bio can significantly increase your brand’s visibility, foster trust, and improve its perceived legitimacy in one fell swoop. It’s a quick win and an absolute no-brainer.
And whatever you do, be sure to use a relevant location and update it regularly — such as if you move or change your business address. This will help ensure that people can always find you no matter what.
Need help managing Instagram for maximum success? Loomly crafts, schedules, and auto-posts to all your social channels and helps you track key analytics. Start your free trial today and get started.